Saturday, December 29, 2012

VEHICLE COLLISION DETECTION SYSTEM(VCDS)


VEHICLE COLLISION DETECTION SYSTEM(VCDS)

Introduction:-
VCDS is a system which locates an accident(VCDS is a name given by me). It gives the exact position and other data such as the car number, the type of car etc. If an accident occurs system will send an SMS to the desired person, ambulance service, control room etc.

Diagram:-

Advantages:-
1.       The casualties in an accident can be operated upon as soon as possible.
2.       The number of overall deaths in an accident can be reduced.

Further improvement:-
I have few ideas that can add upon the overall functionality of the system.


Tuesday, December 25, 2012

Interfacing a Cell Phone modem to a computer


                                               INTERFACING SIM300 VIA COMPUTER


This is an interesting topic. In this tutorial we will find out how to connect a cell phone module to a computer.

First you will need a SIM300 module. You can get it from a leading electronics store for around 800 to 1000 rupees. You will need HyperTerminal; I am saying this because if you have windows 7 or higher version, HyperTerminal will not readily available. All you need to do is get the whole HyperTerminal folder from a Windows XP PC. Or you can search for HyperTerminal on the internet. Just get the HyperTerminal application file and the .dll file. That is enough you don’t need anything now.

Now configure the HyperTerminal. As soon as you open the HyperTerminal it will ask you to set up a new connection. Give a connection name, set the baud rate as 9600 (the baud rate for the SIM300 will be given in the manual, it is mostly 9600). One start bit, one stop bit, flow control through hardware. Leave all the settings as it is. You are ready to connect the SIM300 module.

Now just get a RS232 9pin serial connector to connect the SIM300 module to the computer. If you are using a laptop you won’t be having a serial connection so you will have to use a USB to RS232 serial connector named DB9 by BAFO. Now just connect both the module and the computer.

COMMANDS TO BE GIVEN VIA HYPERTERMINAL

To make a call
1.       AT (press Enter). You will get the response as OK.
2.       ATD<phone number>;
This will call the desired phone number.
3.        ATH(To hang up the call)

To Pick up a call
1.       When you want to pick up a an incoming call give ATA (press enter)

To send an SMS
1.       AT(Press Enter)
2.       AT+CMFG=1(Press Enter)
3.       AT+CMGS=”<phone number>”
4.       >Type the message(Press ctrl+z)

Saturday, December 15, 2012

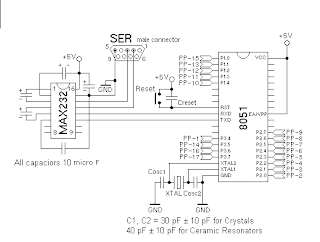
Creating a minimum kit of 8051 microcontroller.


                Now to start up with designing the minimum kit of 8051, There are 3 ways either 

1. Designing the whole system by yourself.

2. Getting a Hobby kit which provides you with all the components and the PCB. The only thing you have to do is to solder the right component at the right place.

3. Getting a ready made 8051 kit. Which contains hex keypad interfacing, 7 segment display etc.

1. Designing the whole system yourself.

                    For designing the whole system you will need a circuit diagram, list of components, soldering iron and wire.

Circuit Diagram:-


List of Components:-
1.       89v51RD2 microcontroller.
2.       MAX232 IC (Used for serial communication with PC).
3.       7805 voltage regulator.
4.       5nos  10micro farad/25V capacitors.
5.        1 100microFarad/16V capacitor, 1 1000microF/16V capacitor.
6.        12V,2A socket.
7.       power switch.
8.        4 serial 10 pin connector.
9.        1 crystal of 11.0592Mhz.
10.    2 non electrolytic 33pF capacitors.
11.    reset switch, 4k resistors ( as seen in the pic, these are not normal resistors).
12.    1 bridge .
13.    1 0.1microfarad box.
14.    and one serial 9 pin connector for RS232 connection. I think this is it.

            I must say, this can be tedious. Finding all the right components and designing the whole PCB. But if you want to get experience in PCB layout designing then its OK.

            For building the minimum kit with METHOD 1 you need to have knowledge about PCB layout designing and Soldering.

2 Getting a hobby kit


                      This is easy and the best way to move on with the learning process. You will get acquainted with the components used for building the kit, on the other hand it is not as hard as METHOD1. There are few hobby kits available in the market which provide you with each and every component and the PCB. You are just supposed to solder the right component at the right place and you are done. The hobby kit which I have used is Vegakit. 


Note:- If you are using vegakit, buy microcontroller 89v51RD2. They don’t supply microcontroller with the   kit.


3 Ready made 8051 kit

                You have to do nothing just buy 8051 programming board, and start to flash your code on the microcontroller. I will not suggest this, unless and until you are a not an engineer, or you belong to a stream other than Electronics.

Friday, December 14, 2012

Introduction to Embedded Systems


                    INTRODUCTION TO EMBEDDED SYSTEMS DESIGNING


 If you take a look around you, you will find that you are  being surrounded by microprocessors and microcontrollers. You can find them in everything from PCs to calculators, from rockets to toys. And as the time progresses this number will still grow. Everyone is trying to control their application through computers. So in this tech savvy age it gets necessary for people to learn about these processors and the way they function. And someone who is really interested can learn how to create their own mini computer.

                The systems that are created to perform a specific task  are called as embedded systems. That is even if the microprocessor of that system is idle it will not perform  any other task. Calculators, cellphones, ipads, missile target sensing, the interface of your washing machine all fall under the category of embedded systems.

                Most of the embedded systems, or you may say 90% of the embedded systems are microcontroller based. Some of the  microcontrollers and microprocessors on which these embedded systems are based are 8051, PIC family, AVR microcontrollers, ARM microprocessors.

                Now you may think what is the difference between a microprocessor and a microcontroller. The major difference between them is that microprocessors are only Logic Units which processes a task. But for the whole process to complete we need RAM, ROM, ADC, DAC, interfacing support etc. On the other hand microcontrollers are the combination of ALU, RAM, ROM, ADC etc (The integration of these components depends on the microcontroller you choose). So due to this it gets easy to implement an embedded system using a microcontroller. The circuit gets reduced and there is no much pain to the brain.

                The microcontroller that we will be using is the 8051 microcontroller. The 8051 is the cheapest and the best chip to start up with. You can find various versions of 8051, the version we will be using is the NXP 89v51RD2.